Wargaming The Cape Frontier Wars
Article And Original Uniform Plates By Chris Ferree
For most of 90 years the Annexed Territories and British Kaffiria was the site of the struggle between African and European. In the closing decades of the 18th century the Xhosa, wandering herdsmen of Bantu decent, encountered settlers of the Dutch East India Company along the Great Fish River. From that time on there was almost constant skirmishing and several major military actions as both sides attempted to gain control of this vital grazing land.
For the most wargamers this era of South African history ahs been largely ignored. However,
there were many interesting actions that readily lend themselves to wargaming. In an attempt to
rectify this oversite, I will describe the describe the terrain, the men, and the tactics that became the 9 Cape Frontier Wars.
The location of the Cape Frontier Wars is between Cape Colony in the west and Natal in the
East. The South is bordered by the sea and to the north are the mountains that paralell the coast.
TThe greatest activity centered around the Great Fish River and the Amatola Mountains.
As the Great Fish River tumbles out of the mountains, the swift current has cut a deep valley.
IIts banks are steep and high, as much as 200 feet in places. As it winds across the coastal plain, it is dotted with stagnant pools and quicksand. All along its length, the Great Fish River is
intersected by deeply cut ravines. Throughout the river valley and up the ravines grows the
"bush", a jungle so thick as to be almost inpenatrable.
The mountains are high and cut with wedge shaped clefts. Bush as thick or thicker than that
of the river fill the clefts. Both the summits of the mountains and the ridges between the ravines are covered by the jungle that cloaks valleys in an errie green twilight.
The bush, which is normally the home to elephant, hippopotamus, rhinosceros, and other
fearsome creatures, was the refuge of the Xhosa and their cattle in times of trouble. In the thick undergrowth literally tens of thousands of men and cattle could be hidden without a hint of their presance. It is from the Great Fish River bush that the Xhosa would burst upon the colony,
making a wide sweep through the farmland to capture as many cattle as possible, then disappear
into the sanctuary of the bush again.
The Xhosa were the most formidable tribe in South Africa at the time. The pigmy-like Bushman, with his weak bow and poison arrows was troublesome and the lightly built and unmotivated Khoi-Khoi were never really a threat to the colony. The Xhosa, stoutly built and intelligent, were another story. The Xhosa planted crops to supplement the produce of their cattle. They were also capable metal workers. Though most of their conflicts were cattle raids, in warfare they were clever and fierce.
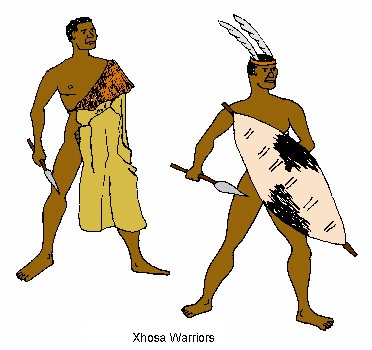
In battle a Xhosa warrior would wear little more than a coat of red clay. He might have a
kaross, a hide blanket that was worn over the shoulders when cold and wrapped around his left arm in battle to be used as a shield. Veteran warriors would sport one or two gray heron feathers stuck into a headband.
The traditional weapons for the Xhosa were the knobkerrie and the assegai or hunting spear. A warrior would carry 5 or 6 assegai with him into battle. He would throw all but one at his
enemy. He would break the last on off to use as a long thrusting knife in hand-to-hand combat.
Contact with Europeans meant contact with firearms, and the Xhosa took to them immediately. With the confusing political situation on the Cape at the turn of the century, gun running went virtually unchecked. Even after Britain's establishment of a stable government, gun running was still a problem. At the attack on Grahamstown in 1819, the Xhosa had a substantial number of firearms, and by 1830 most if not all warriors had a gun of some kind. Xhosa marksmanship was never very good. This was due in part to the poor quality weapons they could acquire in addition to the makeshift projectiles that they used.
The main tactic for the Xhosa was ambush. In the early conflicts the Xhosa would hide out in
the bush and wait for their enemy to come in after them. As the attackers became dispersed in the
jungle the Xhosa would engage the detached groups. As their skill in bush fighting increased, along with the number of firearms, the Xhosa were able to mount real surprise attacks on the Europeans columns. These were not haphazard attacks, but they were able to spot the weak spots in the lines and focus their attack on them
To go against this formidable enemy the Europeans had the commandos of farmers and Burghers (as the early Dutch colonists were called), various detachments of armed natives, and British Regular soldiers. Because the Dutch Company was in such dire financial straits by the 1780's, none of their regular units saw action against the Xhosa, though they did skirmish with the British when they first landed.
The first two Cape Frontier Wars were fought by the Dutch Company using commandos and armed natives. All men of the colony from the ages of 16 to 60 were eligible to be called up for duty. When called, a man was supposed to show up at the muster with a horse, a gun, and a three day supply of food. The Burgher (later to be called a "Boer"), carved out his meager
existence on a frontier farm or small settlement. His skill in hunting and tracking was honed to
a sharp edge, keeping the wild beasts of the veldt and the Bushmen away from their herds.
White men were not the only ones that went on commando duty. The wealthier Burghers would equip some of their Khoi-Khoi servants to serve in their place. The commando was probably better off with the natives along as their skill in mounted combat was equal to the Burghers and in tracking they were superior. As the 19th century progressed, the reliability of the Khoi-Khoi declined and as a result, they were phased out of commando duty.
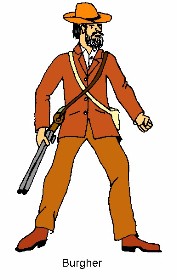
The Burghers had no uniform. They wore the same rugged clothing that they used every day. For weapons, most men carried a "Roer", a large caliber double-barreled gun and a large hunting knife. The riders in a commando, both black and white, were very profecient with their weapons. They were able to fire and reload their guns while moving at a canter. This ability allowed the commando to ride up to within range, fire, and then retire to reload, all the while staying out of spear range.
This tactic worked as long as the Xhosa were in the open. Once they retired to the bush it was a different story. For fighting Xhosa in the bush the only tactic available was to form a skirmish line and go crashing into the jungle, shooting at anything that moved.
Natives fought with the colonist throughout the Cape Frontier Wars. At first there were Khoi-Khoi riding with the commandos, then when the British took over, battalions of native levies were formed. These battalions were not made up of just Khoi-Khoi farm laborers, but contained banished or Christianized Xhosa and refugee Mfengu that had fled Zulu expansion.
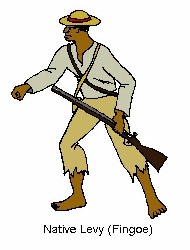
The dress of the natives could range from traditional native garb, to bits and pieces of
European attire, to an actual uniform. For the most part, the levies would be armed with an inferior, probably worn out musket and the assegai.
In action, the levies were used mainly to "beat the bush" and flush the Xhosa out into the open. However, there were actions in which the levies stood in the battleline to blast away at the charging Xhosa warriors.
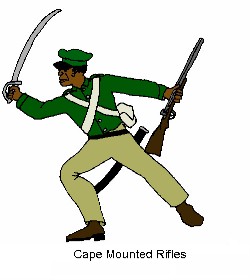
One exceptional native unit was raised on the frontier. This was the Cape Mounted Rifles. This was a regular army unit with a uniform that consisted of short tan or khaki breeches, green shell jacket and broad brimmed hat with red band. The unit was armed with a double-barreled carbine. The C.M.R. were for the most part the only regular cavalry unit on the Cape. In one action, its troopers rode through a Xhosa army three times, then performed terrible execution on their enemy when they finally broke.
The men that made up the C.M.R. were outcast Xhosa that were placed on the Kat River settlement. Unfortunately, during the 6th Cape Frontier War, many of the troopers defected to the Xhosa side, causing the British authorities to disband most of the rest. However, once the colonial fortunes turned around, the C.M.R. was reconstituted and performed admirably for the remainder of the war.
After the 6th war the C.M.R. was again disbanded. It was later reformed under the name of the Frontier Armed And Mounted Police. However, the native troopers were phased out and white settlers, mainly German immigrants, replaced them.
For most of the Cape Frontier wars the British Regular infantryman was the backbone of the Colony's army. Until the last war, he came to the field with the standard Napoleonic style uniform. This was wholly unsuited for a campaign in the thick bush of the Great Fish River and it
was soon torn to shreads.
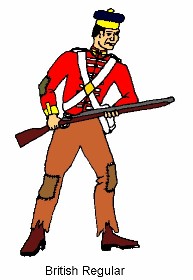
Shoes and trousers were the first to go. New pants were made from rough brown fabric that was produced locally. Shoes were patched from native leather. Jackets were repaired first by taking material from their coat tails. When this was used up any other source of material, including sack cloth, was used. It was not long before the Pride of the Empire looked like an army of beggars.
In all but the Ninth War a muzzle-loading weapon was carried by the British troops into battle. At first this was "Brown Bess", which was replaced in the 1840's by a percussion cap musket. These long firearms were difficult to handle in the bush. A man could expect to get off only one shot before he was engaged hand-to-hand. It was not until the last war that a cartridge rifle, the Martini-Henry, was used en masse against the Xhosa.
In support of the Redcoat the British also used detachments of marines and sailors. Aside from the sailor's cutlass, they would be armed like the infantry. Their uniform would be the same worn on ship, which probably suffered as much from the elements as the infantry's.
The British also brought a few light cannon and rockets into the field. These were manned by
infantry pulled from the line. There were rarely more than two field pieces deployed together on the frontier. The rockets were fired from tubes or troughs. The erratic flight of the rocket was
compounded as the missile careened through the bush.
The principle tactic used by the British was similar to that of the Burghers. They would line up along the edge of the bush and march through the jungle, flushing out as many of the Xhosa as they could. A modification to this tactic was used in the Great Fish River bush. They would haul their cannon to the top of the ridge between ravines. The infantry would then line the bank of the river,ready to move up the chosen ravine. Next, a barrage of artillery fire was fired blindly into the jungle, which would frighten the cattle hidden in the bush and start a stampede. Once the creatures in the bush were stirred up, the infantry would move in. As the Xhosa crossed the ridge on the opposite side of the ravine, the artillery would open up on them with shell.
A tactic used in the mountains involved sending a well armed column on a circuitous march
through enemy territory. However, this usually resulted in an ambush in a narrow pass. The British would lose their supplies and retreat to the nearest fort in which they would be besieged.
After they recovered from this initial setback, the British would then mount a campaign of crop burning and cattle rustling. The net result was a long and drawn out war which ruined the career of more than one British general.
Below are some modifications to The Sword & The Flame for the Cape Frontier Wars.
Organization
European
British- Use the standard organization for Imperial British troops. For Native Levies the troops will be black, the Officer and N.C.O. will be white.
Burghers- Use the organization for Boers. Optionally: Roll 4D6 for the number of figures in a unit.
Xhosa & Rebels
Xhosa Foot--Use the Pathan Organization
Rebel Foot--Use the organization for Imperial British troops except there will be no N.C.O. and Officers will be Natives.
Mounted--Roll 3D6 for the number of figures in a unit. Additionally, there will be 1 Native Officer.
Notes On Organization
During the first 3 wars the Xhosa will all be on foot and will have only spears. For the remainder of the wars the Xhosa may have firearms in the following proportions:
- 4th War--One figure in 10
- 5th War--One Figure in 5
- 6th-9th Wars--From One figure in Two to All figures armed with firearms.
The Xhosa may have one mounted unit for every ten units in a 6th War battle. One unit in five may be mounted for the 7th War and by the 8th, 2 units of 3 may be mounted. During the 8th War,
one of every two mounted units will be a Rebel unit.
For the Europeans, the first 2 wars were fought solely by Burghers. In the 3rd and 4th Wars
one British Imperial unit can be used. From the 5th War on, at least one unit in two will be Imperial British. Of the non-British units, one in two may be mounted burghers.
Starting from the 5th War, the Europeans may have one artillery piece (a cannon).
Formations
Xhosa & Rebels
Foot--In relatively open terrain Native Foot units use Mass formation. In the bush, use Mass except the figures are seperated by at least 1". Musket armed warriors may be placed in the front of a Mass. If all warriors are musket armed, then they may form a single rank line.
Mounted--Xhosa warriors use Mass formation. Musket armed mounted warriors act as their foot counterparts. Rebel Cape Mounted Rifles may use Line or Column.
Europeans--
These use the formations allowed for their type according to the basic rules.
Movement--
Xhosa and Rebel Warriors on foot move as "Zulus", mounted warriors move as "Boers".
Burghers move as Boers.
British move as normal.
Close Into Combat & Stand And Fight
Xhosa and Rebel Warriors use the "Pathan" row on the Charts.
Burghers use the "Boer" charts.
British are as normal.
Firing--
Xhosa and Rebel Warriors Shoot as "Pathans", except rebel C.M.R. who shoot as "British"
Burghers shoot as "British".
British shoot as normal.
Close Combat Modifiers--
Xhosa and Rebel Warriors fight as "Zulus".
Burghers fight as "Boers".
British fight as normal.
Morale--
Xhosa and Rebel Warriors use "Pathan" Morale.
Burghers use "Boer" Morale.
British as normal.
Optional Rules For The Muzzleloading Era
Movement & Fire--
Figures with loaded weapons may make a full normal move and fire. Figures with unloaded weapons must remain stationary to fire. An exception to this rule is made for mounted Burghers who can move and fire every turn.
Fire By Rotation--Allows Regular troops continuous fire and some mobility. The unit must be in a two rank line (Open or Close Order) to perform this maneuver. Fire by Rotation comes in two forms, Fire by Introduction and Fire by Reduction.
- Fire By Introduction--The front rank fires. In the next move the rear rank moves forward in front of the front rank by up to 2 inches and fires.
- Fire By Reduction--The front rank fires. In the next move the front rank moves
behind the back rank by up to 2 inches. The new front rank may then fire.
Should the unit remain stationary then both ranks may fire if allowed. If the unit moves further than allowed by the above rule then none of the figures may fire.
"Cold Steel" Modifiers
In the period prior to the breech loading rifle the British Army relied on the bayonet as much as firepower. To reflect this tactic British Regulars receive the following modifiers when charging: