This game is a simulation of that action. The Zulu player can make three assaults upon the British defenses with all of his figures. The British player must defend against these attacks without any replacements.
Now let's begin the epic of Rorke's Drift
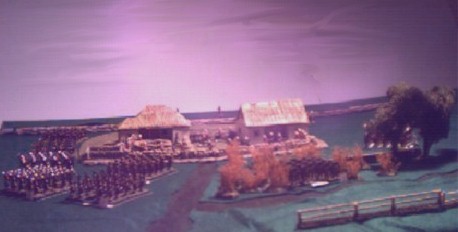
Figure Base Sizes- 1/2" x 1/2" (use a 1" x 1/2" for the Induna figure if it is on horseback) 10- 3" x 3" movement trays are needed. These are used to make moving the Zulus up to the barricades easier. (My movement trays are made of sheet metal and my figures have magnetic bases.)
British- 5 enlisted men and a sergent make up a British unit called a section. There are 4 sections in the British command. There are also two officers, Lt. Chard, the O. I. C., and Lt. Bromhead. Also represented are the personalities Colour Sergeant Bourne, Surgeon Reynolds, Assistant Commissary Dalton, Chaplin Smith, and Pip.
1. Zulu player maps his starting positions. There are a number of squares labeled "Zulu Starting Position" arranged around the sides of the map. At the beginning of each round, the Zulu player marks the 10 squares on the map that his units will start in. Only one unit may occupy a particular starting location. Snipers and the Induna figures do not need to be indicated on the map. Their initial deployment is done in step 3.
2. British player deploys his Troops. The British player now arranges his figures within the fortifications. The following restrictions apply to British deployment:
3. Zulu player deploys his troops. Each unit is placedon an indicated location using the movement trays. In rounds 1 and 2 the Zulu player may pick out up to 5 figures (each from a different unit) to act as snipers. These are set off of the movement tray, next to its parent unit.
Snipers act at the same time as its parent unit, though they do not have to stay with its parent unit.
The Induna is placed in any empty Starting Location or in contact with any Zulu unit
4. Mix up the Movement Counters. Place the movement counters in to an opaque container (like a coffee cup for example) and shake them up.
5. Draw a movement counter.The unit named on the counter is active and takes its turn.
| ZULU MOVEMENT MODIFIERS | |
|---|---|
| Oskarberg Terrace | -3" |
| Fences | -2" |
| Ditches | -1" |
| Brush | -2" |
| Buildings and Barricades | Stop movement |
To climb off of the building, move the figure to the ground in base contact with the building. The figure ends its move at that spot. Figures that are engaged in close combat while climbing off of a building suffer a -2 modifier to its die roll.
The Zulu figure will suffer a -2 close combat modifier if a British figure is defending in the room on the turn that its door is broken in. Zulus entering a previously battered door suffer a -1 close combat modifier.
Once a hole is dug, it can be moved through by moving Zulu figuresover the hole. The figure will end its move in the room directly below the hole. A Zulu figure suffers a -2 close combat modifier on the turn that it drops in to a room. Only one figure per turn may enter a room through a particular hole.
If the Zulu wins the combat (or the wall is undefended) the figure is moved on top of the wall. If the figure is engaged in close combat while on the wall it recieves a -1 close combat modifier. A Zulu figure on the barricade may move normally in its next turn. Zulu figures that are directly behind a figure that successfully crosses a barricade may also cross at that spot but, it suffers a -2" movement penalty. Each sucessive figure that crosses at that point sufferes an additional -2" (1st figure=normal move 2nd figure= normal move -2" 3rd figure=normal move -3" etc.).
It takes 1 full turn to pass through a hole in the wall. Figures that are engaged in close combat while passing through a hole in the wall recieve a -2 modifier to their close combat roll.
If the Surgeon is killed or seriously wounded, Pip will stay with the body until the end of the battle.
To determine the results of the sniper fire use the chart below:
| Enlisted | Roll 1D6: 1-5= miss 6=hit |
| Sergeant, personality or officer | Roll 2D6 2-10= miss 11,12= hit |
If a hit is scored, determine the seriousness of the wound using the "Effects Of Hits" table below.
To determine the results of the fire use the chart below:
| Induna(out to max. range) | Roll 2D6: 2-11= miss 12=hit | ||||||||||
| Sniper(out to max. range) | Roll 1D6: 1-5= miss 6= Hit | ||||||||||
| Firing figure is wounded | -1 | ||||||||||
| Target is in cover | -1 | ||||||||||
| Smith or Dalton is within 1" of firing figure | +1 | ||||||||||
| 0 to 12"
| Roll 1D6: 1-3= miss 4-6= hit
| Over 12"
| Roll 1D6: 1-4= miss 5,6= hit
| 0 to 6"
| Roll 1D6: 1-3= miss 4-6= hit
| Over 6"
| Roll 1D6: 1-4= miss 5,6= hit
| | |||
Zulus that are hit are removed from play for the remainder of the round. The exception is the Induna who is rolled for on the "Effects of Hits" table. If the Induna is seriously wounded or killed, he will not come back for later rounds.
An active Zulu figure that can, must iniate close combat. An active British figure has the option not to engage in close combat, unless he is in a room also occupied by a Zulu figure, in which case close combat is mandatory.
To determine the results of close combat each player rolls 1D6 and adds the appropriate modifiers. The high score is the winner. A figure that is engaged by more than one enemy will determine the results of close combat for each assailant seperately.
| Wounded | -1 |
| Cutting through wall | -1 |
| Moving through wall or window | -2 |
| Over barricade | -1 |
| Over barricade at ledge | -2 |
| On barricade | -1 |
| Dropping through roof | -2 |
| Breaking through door | -2 |
| Entering broken/open door | -1 |
A british figure that loses a close combat is pushed back 1". British figures (and the Zulu Induna)determine the seriousness of their wounds using theee the "Effects Of Hits" table. Other Zulu figures are removed from play.
Seriously wounded figures that are contacted by an enemy figure are killed.
| 1
| Scratch, no effect
| 2-3
| Wounded
| 4-5
| Seriously wounded
| 6
| Killed
| | |||
|---|---|---|---|---|---|---|---|---|---|---|---|
Wounded figures may still fight, but at reduced abilities. The wounded figure should be marked for easy recognition. Wounded figures that recieve a second wound (or serious wound)are counted as seriously wounded.
Seriously wounded figures can not fight or move. Replace the figure with a face up casualty counter.
Killed figures perform no further function in the game. If the player wishes, he can mark the spot where the brave man fell with a face down casualty counter.
Patching up wounded figures- Surgeon Reynolds may attempt to aid wounded and seriously wounded figures during the battle. Only one attempt may be made per turn during a round. A figure may only be treated once during the game for a particular wound.
To make the attempt, both the Surgeon and the patient must be contact. Wounded men can be attended to at the wall, but seriously wounded men must be taken to the Surgeon's station (the veranda of the storehouse) to be helped. When the Surgeon is active roll 1D6 and consult the table below:
| Result Of Aid
| Wounded
| 1-4= No Effect 5-6= Wound repaired, good as new
| Seriously Wounded
| 1-5= No Effect 6= Now only wounded
| |
|---|---|---|---|---|---|
6. Repeat steps 5 and 6 until all units have acted- Continue drawing counters and acting with units until all of the units have acted.
7. Check for building fires- If at any time during the turn a Zulu figure was in contact with a building, ther is a chance that the building will catch fire. Roll 1D6 for each building that qualifies, if a "5" or "6" results the building is on fire. The fire will start on the roof over a randomly determined room. Place a fire marker on the roof at the spot of the fire.
At the end of each turn check to see if the fire spreads. Roll 1D6, if a "5" or "6" results, the fire spreads to a randomly determined adjacent room. The room that the fire spread from is consumed in flames and any figures in it are killed. Add one to the die roll for each turn that the fire does not spread. Once the fire spreads this modifier is reset to zero.
If a building is on fire at the end of a round, make 1D6 fire checks between the rounds.
8. Check Zulu resolve- At the end of each turn, if the Zulus have lost 20 or more figures in the round, then the Zulus must check their resolve. Roll 1D6 and consult the chart below. If the number is listed in the proper row of the table, the Zulus will continue the fight. If the number is not listed, then the Zulus fall back to regroup and the round is over.
| Die Roll To Stay
| 20-29
| 1-5
| 30-39
| 1-4
| 40-49
| 1-3
| 50-59
| 1-2
| 60 or more
| 1
| |
|---|---|---|---|---|---|---|---|---|---|---|---|
9. Repeat steps 4 through 8 until the Zulu's resolve fails or all of the British are killed- After all of the units have acted, the fires have been checked, and the Zulu's resolve is determined, the round is over. If the Zulus continue the fight, put the counters back in the cup and start a new turn.
If the Zulu resolve fails or all of the British are killed then the round is over. If British figures are left, the British player may make 1D6 attempts to patch up wounded(seriously wounded figures may be moved to the Surgeon's station for free), provided Surgeon Reynolds is not wounded or seriously wounded. Also, 1D6 fire checks are made for each building that is burning.
If all of the British figures are killed then the game is over and the Zulus win.
10. Repeat steps 1 through 10- After the British patch up their wounded and made any fire checks needed, play starts again at step 1. The Zulu player will get to use all of his figures, the British only those that are uninjured or wounded.
The third round is fought at night and the following rules apply:
Optional Rule For Chard and Bromhead- Use the British unit markers for shooting only. The British player can only move a unit when the Chard or Bromhead counter is drawn. To move a unit the active officer must be within 2" of the unit. The player may then move the unit. The officer may move with the unit or remain in place. The unit does not fire at this time, it may fire when its counter is drawn. An officer may only move 1 unit during the turn.
If either Lt. Chard or Lt. Bromhead is killed or seriously wounded then Colour Sergeant Bourne may be used to move units. If both Chard and Bromhead are down then Dalton may move units. If all four of the above mentioned characters are incapacitated then the sergeants may act on their own.
Close window to return to the Table Of Contents
